Friday, March 30, 2012

Momenta Cute: Child's Birthday Card

I created this Birthday card for my daughter's friend using the wonderful papers from Momenta
found in the Family Outings Stack 
and with their fabulous line of Puffy Stickers(ST-4745 FAO Circus PFY ICON).
The colors are so rich and bright I just love them!!
I will be linking this card to a challenge:
and before I forget I have just received a supply of Totes perfect for the Cuttlebug.
I have Pink, Giraffe Print with Pink trim, Black polka dot, Pink polka dot, and Blue plaid.
Will be getting more colors in shortly but here is a sneak peak.

Thanks for stopping by,

Friday Funsense: Animals sure are funny!

Couldn't resist the cute critters....Hope it makes you smile today!

Thursday, March 29, 2012

Design Time Thursday: Lets Hop Strolling through the Park!!

Hello Ladies....Just a quick reminder to let you know there is still time to enter this weeks Challenge-Strolling through the Park Theme
All of the beautiful patterned paper is from Momenta I love their Family Outings Stack has soooooo many wonderful colors and themes....it's a Happy Paper Collection....visit their site HERE.
Here is my 2 Page Layout I created using all 4 Elements. 
There is just a small touch of glitter glue on the clouds along with embossing.  There is some embossing & white marshmallow glimmer mist on the grass on the right side.

Here is a close up of one of the metal charms-there are two on this layout.  I also used my Bow Maker to make the three brown bows on this layout.
Here is one last look at the layout.

Hope you will find some outdoor inspiration and create a project to link up to our Challenge.
CLICK HERE to go the Challenge Post.
Also will be entering this post in Emma's Throwback Challenge this week.
I used Creative Critters for the Clouds and Ashlyn's Alphabet for the Title.
~Hugs

Wednesday, March 28, 2012

Watch this Wednesday: A gift from a friend!

Hello Friends....I wanted to post a video sharing a new Easter Theme project I've been working on but my voice has been gone all week and I don't think any of you want to listen to Kermit the Frog!!!
Luckily I received this wonderful package the other day from an online friend and I couldn't wait to share it with all of you!
You can see why receiving this just made my day.....She sent her beautiful card blank so I could still gift it if I want to (I don't think I can part with it!) and some yummy PEEPS! So Perfect. 
She is so talented! And she said I could share her cute treat idea with all of you these adorable crosses would be a wonderful neighbor gift or basket filler.  What a wonderful way to remember what Easter is all about!  I recognize her label as a Stampin' Up punch and there are some crosses available on a few different Cricut Cartridges that you can try:
Car Decals
Chip Decor
Craft Room Exclusive-Easter Blessings
Designer's Calendar
Easter Seasonal Cart 2010
Indie Art
I really love my Easter treats from my online PEEP! 
Thank you so much Trish....you really made my day!!
Here is her website  CLICK HERE....be sure and check her out she has some really cute ideas!

Tuesday, March 27, 2012

Tip Tuesday! Basics of the Cricut Craft Room!!

Welcome to another Tip Tuesday here at the Creative Cutter Room! Today Design Team member Jessica with Craftin' and Stampin has a great tip to share with us!

 Hi All!

Welcome to Tip Tuesday at the Creative Cutter Room! My name is Jessica from Craftin' and Stampin', and for today's tip, I wanted to show you the BASICS of the Cricut Craft Room!

I know that the Cricut Craft Room can be A LITTLE intimidating! Heck, I was VERY intimidated when I first strarted to try and use it! I remember thinking I would NEVER get the hang of this! But, then again, I thought that about the Gypsy as well! But, now, I'm a PRO :D! I promise you, with enough patience, enough practice, and a little help, you will ALL be pros at utilizing the Cricut Craft Room!

So, sit back, relax, and enjoy the Introduction to the Cricut Craft Room video I have made for you!


OK All, hope you enjoyed it! Hope you were able to get a few pointers! I also hope it took some of the anxiety away from using it!!

Thanks so much for coming by the Creative Cutter Room! And don't forget to stop by my blog for some more pointers!!!

Oh, and I hope to find you all Craftin' and Stampin'!

Thanks Jessica!

Saturday, March 24, 2012

Baby Onesie Mini Album

Here are the details in this YouTube video....I had planned on posting this to Watch this Wednesday but I was so glad to have a Guest Designer that day.


This is a mini I created as a Baby Shower Gift for my neighbor.  It turned out so cute I wanted to share it with all of you.  I hope it inspires you to try a mini...they make great personalized gifts and let's face it ladies it is so nice to have a completed project that isn't just a greeting card.  I am completely addicted to Mini Albums in general and it was nice to have a reason to make a baby one.....or should I say Onesie!
~Hugs

Friday, March 23, 2012

Friday Funsense: Taking out criminals and other bugs! & St. Patrick's Day Challenge Winner

Shape Card Challenge Below.....


This is something I haven't heard about before but seems like a good alternative with multiple uses!

I know some of you own GUNS but this is something to think about... 
If you don't have a gun, here's a more humane way to wreck someone's evil plans for you. Did you know this? I didn't. I never really thought of it before. I guess I can get rid of the baseball bat. 
Wasp Spray - A friend who is a receptionist in a church in a high risk area was concerned aboutsomeone coming into the office on Monday to rob them when they were counting the collection. She asked the local police departmentabout using pepper spray and they recommended to her that she get a can of wasp spray instead. 

The wasp spray, they told her, can shoot up to twenty feet away and is a lot more accurate, while with the pepper spray, they have to get too close to you and could overpower you. The wasp spray temporarily blinds an attacker until they get to the hospital for an antidote. She keeps a can on her desk in the office and it doesn't attract attention from people like a can of pepper spray would. She also keeps one nearby at home for home protection. Thought this was interesting and might be of use. 

On the heels of a break in and beating that left an elderly woman in Toledo dead, self defense experts have a tip that could save your life. 

Val Glinka teaches self-defense to students at Sylvania Southview High School. For decades, he's suggested putting a can of wasp and hornet spray near your door or bed. 

Glinka says, "This is better than anything I can teach them." 
Glinka considers it inexpensive, easy to find, and more effective than mace or pepper spray. The cans typically shoot 20 to 30 feet; so if someone tries to break into your home, Glinka says "spray the culprit in the eyes". It's a tip he's given to students for decades. 

It's also one he wants everyone to hear If you're looking for protection, Glinka says look to the spray. "That's going to give you a chance to call the police; maybe get out." Maybe even save a life. 

Did you also know that wasp spray will kill a snake? And a mouse! It will! 
Good to know, huh? It will also kill a wasp of course!!!
Now for the winner of our Design Time Thursday-Shaped Card Challenge
True Random Number Generator  20
Congratulations Monica please use the Contact Me form above to send me your snail mail to receive your prize.  Thanks everyone for joining in we had a tremendous response and I hope many more of you will enter our Stroll through the Park Challenge going on now!

Thursday, March 22, 2012

Design Time Thursday: Lets Hop Strolling through the Park!!

Welcome to the Strolling through the Park Blog Hop and Challenge with the 
How about a fun hop and challenge?

Theme: Create a project incorporating something you would see in a park and must include 4 elements! 

Visit each of the following 6 Design team members, find the required element from 4 members of the DT and submit your new project here at the Creative Cutter Room for a chance to win a prize!

Submit your new project for a chance to win a prize!

THE PRIZE
Cricut Tool Trimmer!


Challenge Starts today March 22 and runs until April 4, 1012!

You will need to collect  4 elements total and include each element on your project and then submit your project at the Creative Cutter Room!

Follow the rules then submit your new  project here at the 

Looking forward to seeing your creations!

Some Rules to keep in mind while playing along:
Project submissions must be new, no back linking
CCR must be mentioned in the description with a link back to here
Entry must fit theme to be qualified for the prize
Prize must be claimed within 2 weeks
Please link your project posting not just your blog
Please leave a comment after linking

You have until April 4, 2012 to enter your project.
Here is the Line Up 4 members will provide you with a required element!

Wednesday, March 21, 2012

Welcome Guest Designer Lisa!

Hello Creative Cutter Friends... Today we have a guest designer! 
We are so happy to have Lisa with Lilfeather's Scrappin!

 Lisa made this beautiful box, thanks Lisa for Guest Designing with us today!
Here is what she had to share with us:
I am married mother of 2 in California. 
 Love the outdoors, and doing things with the family
I love to work and play with paper, buttons, feathers, and craft items
Enjoying the Country life raising Poultry and Pygmys
Living the good life like a Feather in the wind. 
Happy to be a Guest Designer with Creative Cutter Room
I have created a Memory Box
This is a box I have wrapped with Paper by GCD
Using a small square box and some lace
I have glued the lace on and added the
Butterfly eyes - Scrapbook Stamp Society
The roses are a part of the paper, I just cut them out and placed them.
The paper is Naturally Glittery also
I have a Chipboard that is the Dream Sentiment
The Purple feather with a Guinea feather attached now also
The inside of the box is lined with Blue tissue paper
and then stamped by creator (me)
This stamps is a PSA Essential
Peel & Stick
This is a great stamp also as it may be personalized and set purchased
This is a great little memory box and a Fabulous Image
Thanks for coming by and seeing my project today and I am very happy to a guest designer
with Creative Cutter Room
Lisa

Thank You Lisa for sharing your Creativity and Talent with us!
 Please visit Lisa and let her know how much we liked her project HERE!

Tuesday, March 20, 2012

Tip Tuesday Here: Inexpensive Embellishments!


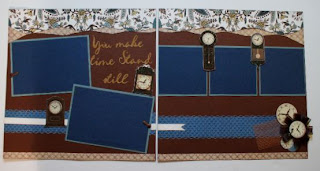
Once in awhile when I begin to gather products to create a layout I find that I just can't find that one perfect embellishment that will complete my page.  Sometimes it's because we don't have a coordinating piece and sometimes it's because the paper seems like enough and to just throw stuff on the page seems to take away from the design.
For this Tuesday's Tip I thought I would share one of my favorite and inexpensive embellishment tricks.......I fussy cut!
Fussy cutting simply means to carefully (some would say meticulously) cut around an image or shape found on a piece of paper.
Many of my layouts are inspired by the paper I buy....so when I find a single sheet or a collection that makes me want to create I often will carefully review the design for an image or  shape that I think is key to the design.  In the case of this beautiful paper collection by DCWV called
The At Home Stack
I was immediately drawn to the shiny & glittered clocks that appeared on one of the papers.
I selected a few of my favorites and fussy cut around each one with my Cutter Bee yellow handle scissors.  These are the best scissors I find for cleaning up the edges of my Cricut layers and for fussy cutting around images.   I always ink the edges when I fussy cut to hide any of the white core from showing around the sides and that seems to make the images have more depth.
I will also often times add foam tape for dimension as well.
I hope you like this new layout I will be adding to the Creative Cutter Shop and I hope you feel inspired to break out your favorite pair of small scissors and start embellishing! 

Saturday, March 17, 2012

New Cartridges

First of all Happy St. Patrick's Day everyone!!!! Hope you have your Green on today.
now on to some NEW CARTRIDGES...
1) Cricut Paper Doll Teen Scene - This cartridge has 3 girl dolls and two boy dolls, and each doll has 10 hairstyles and 20 outfits with small accessories (not as much as Paper Doll Dress Up or Everyday Paper Dolls).  Clothes and hairstyles are interchangeable for dolls of the same pose.  Great for older girls and tween/teen pages!

2) Cricut Art Deco Cartridge - 3 Coordinating Fonts on this unusual, roaring 20s style cartridge.  Easy to make gorgeous monograms.  My favorite of this release!

3) Cricut Spring Cottage Cartridge - Spring Cottage is a seasonal release that has some fun, quick and easy garden themed items.

4) Cricut Chip Decor Cartridge - Exclusive to Hobby Lobby, this basic font cartridge has two different fonts with icons and words. 

5) Cricut Imagine Contemporary Nature Cartridge - A paper only Imagine cartridge with a masculine twist.


Friday, March 16, 2012

100% Sweetness....Boy Version

This is the little boy version of the card I posted on Wednesday.
Hope you like it.

Wednesday, March 14, 2012

Watch This Wednesday


After being inspired by Design Team member  Georgiana from Carson's Creations
I decided to try and use some of my cardstock scraps to create this card.
Here is a video showing you the details.
Thanks for Watching!

Tuesday, March 13, 2012

Quick Tip Tuesday!! Scrap Paper!

Good Morning!
Welcome to Tip Tuesday.
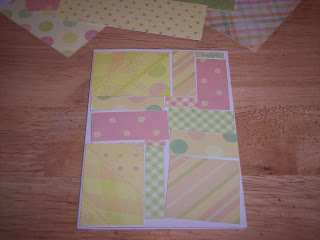
This is Georgiana from Carson's Creations and I would like to share a quick and easy tip on how to use those scraps that have been accumulating.


First, gather a pile of your scraps and spread them out on an open space. Then pick the color theme you would like to work with. I selected pastels since Spring is approaching.
Use your paper trimmer to cut square and rectangular pieces, which will be used to create a mosiac background. I love this technique since no two cards will look alike. 
Place the pieces on your card base or layout to create an appealing background. Once you are content with the pattern, you will adhere each piece.
 Add your die-cut or image and any extra embellishments.
Don't forget the envelope! You can use strips of scraps to create a peek-a-boo effect. The recipient will get a peek at what the card will look like inside.    
Looking forward to seeing your projects that you make using scraps.

Thank you Georgiana for sharing such a great tip on how you use your scrap paper! Please be sure to stop by Georgiana's blog for more great creations!

Have a great tip? We would love to hear it, please just leave us a comment!